In the world of computer vision, it’s no secret that your model is only as successful as your label quality. It takes persistence, patience, and a workable process to build an effective model. When starting out, establish the appropriate questions and define your hypothesis. Consider your budget, workforce size, timeframe, annotation type, dataset size, and overall project objectives.
Your project development depends on choosing the appropriate tools, creating an annotation outline, and selecting a service. Superb AI's platform helps businesses succeed; knowing the best strategies, techniques, and hacks will help you achieve those goals. This article will help in starting your project off on the right foot.
Setting Up Your Project
Designing your project will vary depending on the parameters you’ve defined, but if you’ve chosen to utilize the Superb AI Suite, here are the first steps your team should take, including name, description, and annotation types:
Classification Explained
Every machine learning model benefits significantly from proper data labeling, but not every task requires classification. The following menu allows you to subdivide image and video categories into different branches.
1. Start by naming your super category on the far left-hand side of the menu. It's usually best to name your super category after your project's overarching theme. For example, if your project is about identifying certain animals, "Animals" would be an appropriate category name.
2. Next, you can choose how you want your model to report on that category – multiple choice, multiple selection, and open response are all available options.
3. You can subdivide any category into subcategories on the category setup page. For example, you could categorize animals as dog, fox, or bird, or whatever species you wish to classify based on your classification model.
4. Lastly, if you’re looking to get even more specific, you can allocate your subcategories even further by including different species of each animal. However, this step is not always required.
5. Once you have completed this step, you are ready to upload your data and start labeling! To finish, click "Finish" followed by "Yes."
Uploading Your Data
Academy 1.2 - Uploading Data
At this stage, you'll be on the project overview page. Navigate to the upward arrow on the top left corner to begin uploading your data. You'll notice that there are four ways to add data to your project: File, Cloud, URL, and CLI. The way to add data to your project will depend on the size of your project. Each approach has advantages and disadvantages, depending on your workflow's scale.
Data Integrations and Best Practices
An important part of creating a labeling pipeline is integrating and uploading your datasets, but not all strategies are created equal. Choosing the right method, considering the alternatives available, and understanding how best to approach this aspect of the project setup is critical. Some approaches support larger file sizes and faster upload speeds, while others are sluggish and ill-suited for handling large datasets.
File Uploads
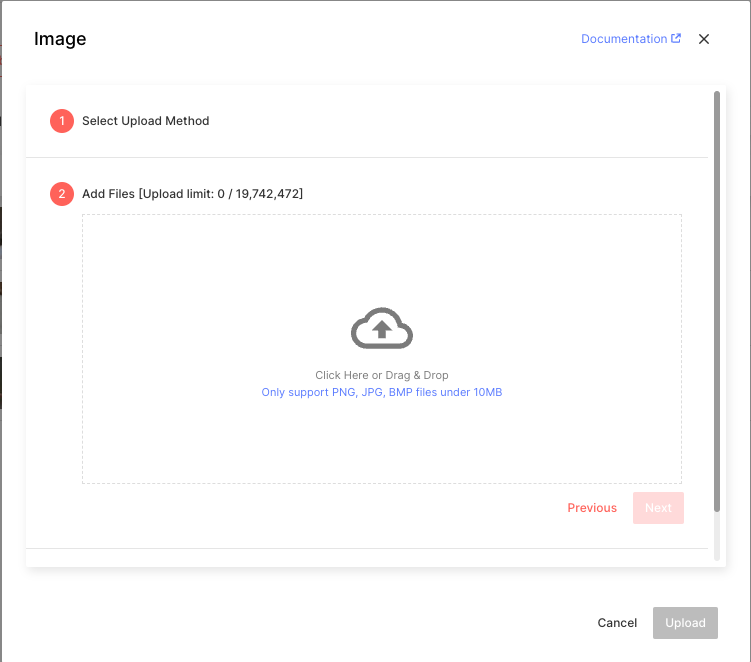
The easiest way to add data to your project is through local storage. It works in much the same way as dragging and dropping files as attachments to an email, but on a grander scale. Although simple to set up, this method is not always the most suitable option. Here's why:
Your project’s data is extensive
Data labeling projects often require large sums of data for annotation. Storing and uploading your image files via a local hard drive is much slower.
Access is limited
Because your files are stored on a local hard drive, only the person working on that computer has access. This is extremely limiting to robust, collaborative teams, and is not conducive to remote work culture.
File sharing is slow
If you're looking to share your images between team members for any reason, transferring those files can be somewhat of a nightmare. Having universal access via a server or cloud is much more efficient.
On the other hand, uploading your files locally works great for some teams. Consider exploring this avenue if:
Your team is small
If you’re working on a small team, say, just one or two people, then there’s no need for expensive cloud integrations or servers.
Your project is also small
If you’re working with a small amount of data or you’re just test-driving a platform, then the standard upload method works just fine. This is a great avenue for students or those curious about data labeling.
Cloud Integration
The easiest way to add data to your project is through local storage. It works in much the same way as dragging and dropping files as attachments to an email, but on a grander scale. Although simple to set up, this method is not always the most suitable option. Here's why:
Set up your project anywhere
For a team without a corporate office base, cloud storage allows for universal accessibility without being tied to a specific location, alleviating the problem of being geographically restricted.
Have confidence in your data’s protection
The major players in cloud computing are backed by state-of-the-art security protections and encryption.
Speed
Rather than using conventional uploading methods, integrating your data through the cloud is quicker, doesn't require an internet/power connection for uploading and downloading, and isn't dependent on a person to ensure that the procedure runs smoothly.
Your project size
Cloud integration is best suited for larger projects requiring hundreds or thousands of images, and as a result, even more labels. Relying on local storage to host your data doesn’t offer the same support that an external cloud would.
You’re working with video
Cloud integration is currently the only way to add MP4 files to your project (although you can also directly upload image sequences instead). Getting your data integrated into the Superb AI Suite is a simple and straightforward process. All you need to do is follow the upload menu steps listed below.
1. Select “Cloud” from the upload options before choosing “Next.”
2. In this step, choose your data format, either image or video.
3. Next, select your cloud storage, i.e. Google Storage, AWS, or Microsoft Azure.
4. From here, you can select which integration corresponds with your project and choose one, or multiple buckets.
5. Once your bucket is selected, find the folder containing your data by scrolling through and clicking it.
6. Select your data storage method:
Superb AI Storage
Choosing this method moves your data from your cloud provider to Superb AI’s servers. Doing so allows your team to manipulate and label your images or video files. Note: Superb AI uses end-to-end encryption, remains SOC 2 Type 2 Compliant, and has no access or permissions to use your data.
Your Own Storage
Choosing your own storage keeps your data in your cloud storage and is solely used for read-only integrations. In this sense, you are in total control of your data’s protection.
7. Choose your dataset. In the following dropdown menu, you will be able to select which dataset your team will be working with. Select it before hitting next.
8. As a final step, assign your dataset to your project by clicking the dropdown menu and selecting your project name. Click “Done”, and select “Upload” to finalize your project. Wait for your data to upload, and begin labeling!
The problem with connecting to the cloud is that you may not always need to, especially when working on small projects where local storage is adequate. Furthermore, cloud storage plans have different rates, and they might not be economical for everyone. However, cloud storage is optimal for large, intensive data labeling initiatives.
URL/CSV
A team can manually enter data via a URL or a CSV attachment, or they can input a large batch of URLs all at once using a CSV template. It might be more suitable to use a URL or a CSV approach in certain situations, ones detailed below.
The server hosting your data is not compatible for integration
Whether using Superb AI’s Suite or another data labeling platform, not all servers or cloud platforms are supported. Using a URL or CSV circumvents this issue by remotely and manually accessing your data.
Your URLs are publicly accessible
In order for Suite to access your image data, your URLs must be accessible to the general public.
CSVs and URLs are easy to create
For the novice practitioner where coding skills are lacking, creating a URL or CSV file from the provided template is less daunting approach than using an API or CLI.
Using a CSV file to store a URL or a series of URLs is simple, saves you money on cloud storage, and allows you to access your image files directly from your company's servers. Here's how you can add an attachment to your project workflow:
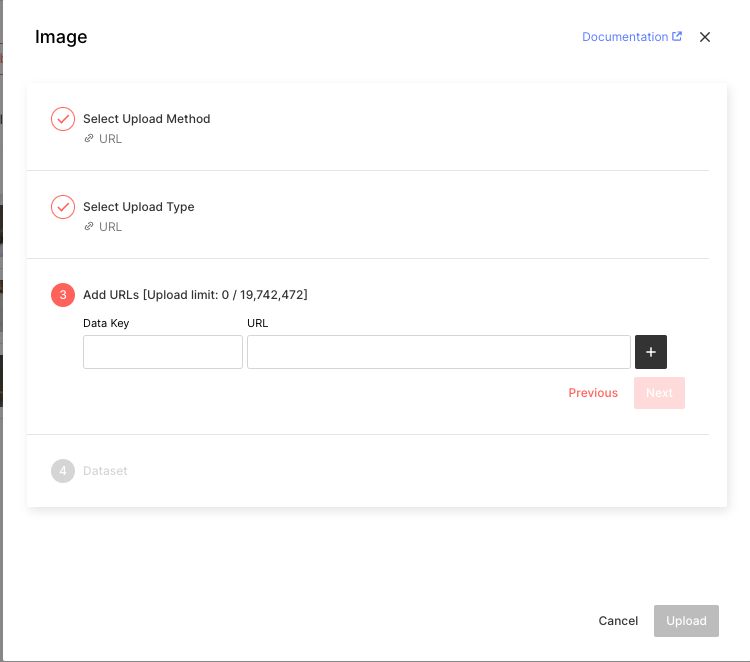
1. After choosing "URL" from the upload menu, you can either select "URL" and add each one individually or "CSV" and upload a list of URLs all at once. To obtain a Superb AI CSV template, click here
2. There are two methods for manually entering URLs on a team; you may enter data keys and URLs in the appropriate fields or select the arrow to add more URLs. Repeat this process as needed. On the other hand, if your team wishes to add their data through CSV, you may simply drag and drop the file into the upload box. You'll see a preview of the data keys and URLs if your file is properly formatted. Click "Next."
3. From here, you can assign your data to the appropriate dataset by selecting it from the dropdown menu.
4. Finalize your project by clicking “Upload.”
CLI
Superb AI also supports file upload via its CLI, or Command Line Interface. Any machine learning practitioner knowledgeable with coding can adequately include their data using this method. Using the CLI to upload your files is ideal in the following scenarios:
Your data is located on a remote or local server, or split between servers
Using the CLI allows you to access your data from multiple servers remotely and simultaneously, cutting out the headache of taking a manual approach.
You’re uploading multiple iterations
Most machine learning projects require more than one iteration of data. Knowing the commands to quickly add data to your project saves your team a lot of time and energy than other, more involved approaches.
You know how to code
Though not difficult, configuring the Superb AI CLI still requires basic coding knowledge. Attempting to try your hand at this may prove more cumbersome and trouble than it's worth without prior knowledge. In other words, it’s just not worth it.
Using the CLI is much faster than most upload approaches, aside from cloud integration. For teams lacking the funds for massive cloud platform subscriptions, or for those with smaller projects, using the CLI makes perfect sense. To tackle it in the Superb AI Suite, you’ll first need to configure your CLI:
1. After selecting “CLI” from the upload menu, you’ll be prompted to install it on your PC. Open the terminal, and type in the following to the command line, sans the dollar signs:

2. Next, you’ll need to configure the CLI using a random, one-time Access Key. You can find that Access Key by returning to Suite and hitting “Next.” Here, an Access Key will auto-populate and act as a form of authentication. It will look something like this:

3. Once you’re given the Access Key, return to the terminal and type it in the appropriate field. Add your account name. It should look like this:

4. Lastly, return to the Suite. Here, you can select whether you’re looking to upload raw data or raw data with labels. This will determine the correct commands. Return to your terminal, and fill in the spaces with asterisks. Your data should begin uploading.

As a rule of thumb, you should always refer to your Label Page to make sure your data is uploaded correctly. This is an easy, yet important step that helps mitigate any problems early on. Though the process itself is a simple one, you can always refer to our documentation if you still have questions.
Write Your Annotation Instructions

Before you dive into labeling, you need to work on annotation guidelines to ensure consistency, accuracy, and ideal outcomes. Annotation guidelines can be used to define labeling rules in a simpler way and in terms of numbers. For example, "Do not annotate cars with more than 10 percent of its body occluded" or "Do not label cars that are partially obstructed."
Having uniform, concrete instructions is the key to writing a successful guideline, and therefore, a successful project. Always begin by defining the goal of your labeled data to your team and outlining edges, so they have a clear understanding of what the end result should look like and what their model is trying to accomplish. Failing to do so only leaves room for confusion and vast differences in perception of the desired outcome, and therefore, mistakes. For more tips on how to write crystal clear annotation guidelines, be sure to read our recent post on writing better annotation guidelines.
Add Annotators to Your Project and Assign Roles
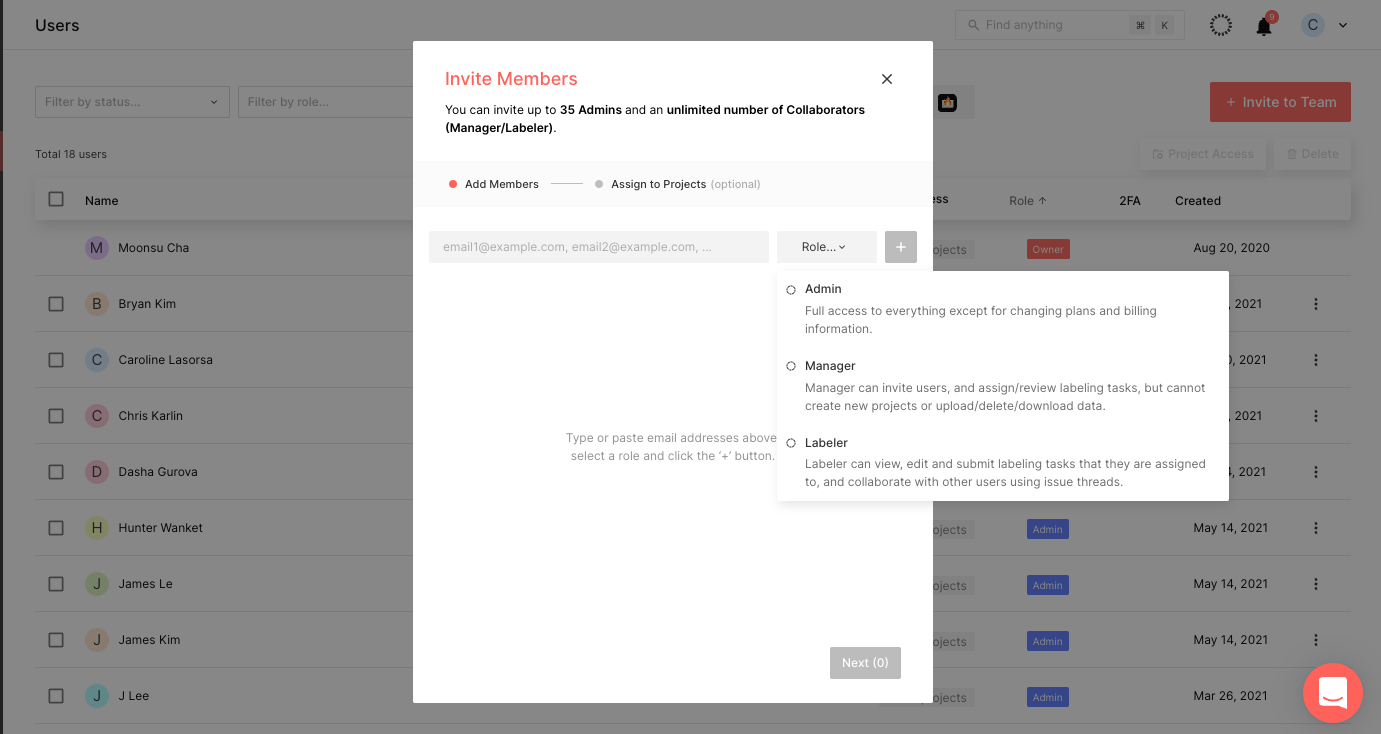
Once you’ve completed your project setup, the next step is to add annotators. To do so, first, make sure you are on your project overview page. Then, toggle the menu on the left-hand corner to expand it. Select “Users.” From here, you will have the option to click “+ Invite to Team.” Once prompted, a new team member can be added via email address, and their role can be assigned.
Role-based access controls allow for different team members to have different roles and levels of access to your project. This prevents certain team members from making accidental or detrimental changes to the project, and it helps keep your team within their assigned responsibilities. Superb AI divides responsibilities into the following hierarchy:
Project Owner
This person oversees the entire account and can invite users for all roles, including Admins, Managers, and Workers.
Admin
A project admin has access to everything, except changing plans and billing information. This person can also invite other Admins, Managers, and Labelers.
Manager
The project manager can invite users and assign or review labeling tasks. This person or person(s) cannot create a new project or upload/delete/download data. The manager can also only invite or delete data Labelers.
Reviewer (coming soon)
Reviewers are assigned to specifically edit and review labels, taking the burden off of managers and providing a specialized skill to the labeling workflow. Many reviewers are also labelers, but not all labelers have the acquired skill set and knowledge to be expert reviewers.
Labeler
A labeler can view, edit, and submit labeled data in which they are assigned as well as collaborate with other labelers using the Issue Thread. Labelers cannot invite or delete users.
When determining roles and access levels as a team leader, it’s best to look at each person’s experience levels and expertise. Knowing your team’s strengths and weaknesses and how they help elevate the business is a great place to start.
Determining Team Structure
Having the right resources is key to succeeding with any type of team, from construction to marketing to sports. Labeling is no different. Having too many or too few people on your team can lead to missed deadlines, fatigue, wasted money and resources, and more errors because of a lack of uniformity. Here are some ways to build your team the right way:
1. Run a sample labeling workflow.
Take a sample size of your data, run through the labeling process and see how long it takes. This gives you an idea of the complexity of your images and what you can expect from your labelers. Start with this calculation

2. Calculate the minimum hourly throughput for labelers and reviewers.
Difficulty level, time allocated, and sample performance are all factors that should be considered when applying this method. If you're using Superb AI, you'll need to determine if CAL will be included in your workflow and its performance. Then, you can estimate daily throughput to determine the appropriate number of labelers.
3. Go by this rule of thumb.
The ratio of labelers to reviews is usually 3:1. Of course this can vary based on project size and deadline, but it’s usually a good standard to go by.
4. Shape your team like a pyramid.
Using the 3:1 ratio or dividing the labeling time for your sampled data by the deadline, calculate how many labelers you need. Divide the number you determine by your team’s roles and take it one step further. A well-structured team might have one project manager, two reviewers, and three labelers, or something similar for each sample size. Labelers and reviewers should not be all or none, but balanced teams are crucial to a productive workflow.
Assigning Labels
Aside from building your team and granting them different levels of access and responsibilities, some Project Managers and Admins elect to also assign and distribute labels amongst annotators. To do so, you’ll want to take the following steps:

1. Head over to your Labels page. Here you’ll see a comprehensive list of your labels with the option to select each one that you would like annotated.
2. Tick the box next to each image or video you would like to have labeled.
3. Once you’ve selected the labels you’d like to assign to different team members, click the “Assign” button on the top right-hand corner of the page.
4. Here, you’ll be given the option to select who will work on your labels. Those assigned will be notified before they can begin working.
5. Next, make any adjustments to the number of labels assigned for annotation in the next menu. Do so by sliding your mouse along the horizontal lever, and notice how the number in the box, which tells you how many labels are to be distributed, adjusts depending on which direction you slide it.
*Note: This is convenient if you’re working with a large amount of data and do not wish to select each label individually and instead select them all before making the appropriate adjustments.
6. Decide how you wish to distribute your data. Superb AI supports two different methods of data distribution, depending on your preference:
Equal Distribution
Assign labels among team members equally among team members.
Proportional Distribution
Ensures that the total number of labels is as close to even as possible after having been assigned.
How this benefits your organization
As a project manager, delegating responsibilities is a huge part of overseeing the labeling process and ensuring that tasks are completed in a timely manner. If, for example, one labeler is working full-time while another is working part-time, it would be unreasonable to expect the same level of output from each person.
At the same time, labelers are hardly responsible for a single iteration of data. Dividing the work evenly would guarantee that the full-time worker would finish their labeling tasks much faster than the part-time worker. Instead, assigning labels according to output levels and time on the clock makes much more sense and yields faster results.
Having this option grants teams more flexibility and higher levels of productivity overall. As managers, you know your team best; adhering to their strengths and schedules will only elevate them.
Next Steps
After running through the initial exercise of setting up your project, like determining object classes, assigning roles, and optionally delegating labels, your team is ready to begin labeling.
In the next post in this series, we’ll discuss how to properly annotate your image data, identify errors, and audit results. Later posts will cover video labeling, automated data labeling and how to optimize your datasets and projects using analytics. You won’t want to miss it